App in hand, dream in heart, but the App Store feels like a confusing mountain to climb?
Don’t sweat it. That’s what this guide is here for! Think of it as your friendly map and compass, for the App Store.
We’ll ditch the confusing jargon and speak your language. How to build a jaw-dropping app store page, ace the review process, and shout your app’s awesomeness from the rooftops (well, maybe just social media).
Ready to make your app the new big deal everyone’s talking about?
Grab your backpack, fuel your creativity, and dive in to learn the steps of publishing an app on the app store.

So you’ve built an amazing app, Kudos. But before we launch it on the App Store, let’s do some housekeeping.Getting Started – Some Must Knows
Must-have tools
To submit your app, you’ll need an Apple Developer account and an Apple ID. Using a macOS computer isn’t mandatory, but it’s convenient for the development tools you’ll likely use.
For example, Xcode, the primary app-building platform, lets you prep your app for publishing right within the program.
Legal stuff matters
Launching an app involves legal hurdles. For example, in Europe, you need to follow GDPR rules, and in-app purchases require PCI compliance. Other countries may have similar legal merits. Please align your app with your country’s internal policies before submission.
Don’t forget about user data. How you handle it is crucial, so check Apple’s guidelines to avoid any trouble. Remember, only use content you own or have permission to use. Breaking this rule can get your app kicked out real soon.
Don’t jump the gun
If you’re still coding away, it’s tempting to envision your app shining on the App Store. Apple expects each app to be fully operational and bug-free at the time of submission.
Prerequisites for Submitting an App on App Store
Here’s a detailed breakdown of the key guidelines to remember when preparing your app for submission to the App Store:
- It’s crucial that developers ensure their app fully adheres to Apple’s guidelines. This encompasses all aspects of the app, including but not limited to analytics services, third-party SDKs, and advertising networks.
- Any attempts to manipulate or cheat the App Store’s review system, or to artificially inflate app ratings, will lead to serious consequences. Such actions could result in the removal of your app from the Store and potential expulsion from the developer program.
- Merely copying an existing app with minor alterations is not permissible. Your app should offer unique value and not be a derivative of an existing application.
- Apps must not contain any content that can be deemed objectionable. This includes discriminatory content, explicit materials, and other similar categories that Apple deems inappropriate for the App Store.
- Your app must have a privacy policy that aligns with all of Apple’s privacy guidelines. This is a critical aspect of user trust and legal compliance.
- Children’s Apps Compliance: If your app is designed for children, it must strictly comply with Apple’s specific guidelines for kids’ apps. This includes appropriate content and privacy safeguards.
- Apps must offer functionality that extends beyond what a simple mobile website can provide. The App Store seeks to offer apps that leverage the capabilities of iOS and provide a rich user experience.
Steps to Publish Your App on App Store
Step 1: Sign up for the Apple Developer Program
Before you can submit any app to the App Store, the first step is to become a member of the Apple Developer Program. You can sign up for an Apple developer account here.For individuals or sole proprietors, it’s pretty straightforward. Use your Apple ID to sign in and make sure you have two-factor authentication turned on. Apple will need some basic personal details from you, like your name and address.

If you’re signing up as an organization, the process is a bit different but still simple. You’ll need your Apple ID with two-factor authentication, of course. On top of that, be ready with a few more things: your D-U-N-S Number, proof of your legal entity status, someone who has the legal authority to bind your organization, and your organization’s website.Once you’re ready with everything, click on “Start Your Enrollment”. Here’s your next move: Get your app’s distribution profile and certificate sorted. For beta testing or launching on the App Store, you need a distribution provisioning profile and a distribution certificate.The smoothest way to get this done is through Xcode, especially if you have automatic signing enabled. Xcode will take care of certificates, signing identities, and even device registration for you. If you’ve already got automatic signing set up or you’re confident with manual signing, you can skip ahead to the next step.Step 2: Build a Distribution Profile
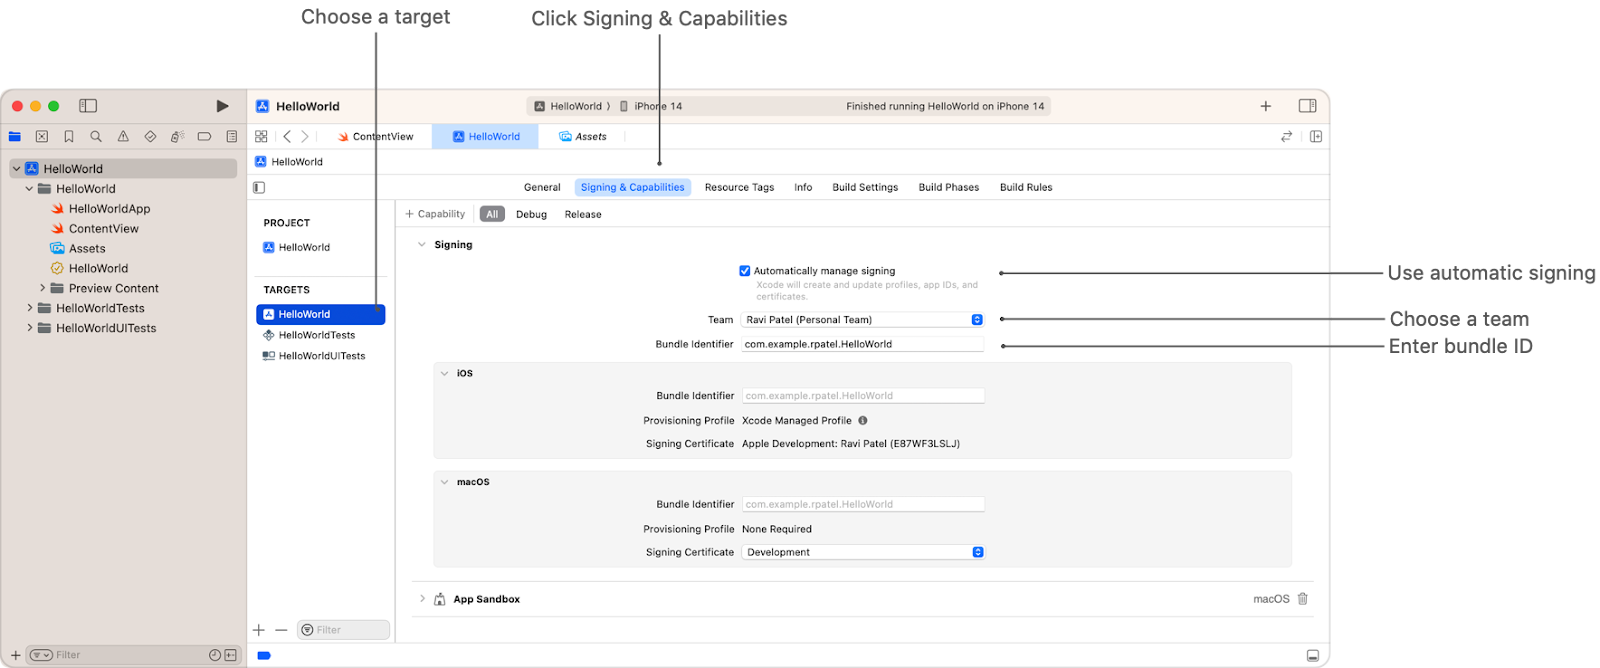
First things first, add your Developer Program account to Xcode if you haven’t yet. Just open Xcode, select Preferences, and click on Accounts. There, hit the + sign and add your Apple ID. Once you’re signed in, enable automatic signing by going to the Project Editor, selecting a target, and heading to Signing & Capabilities. Check the ‘Automatically manage signing’ box and select your team. To get your app on the App Store, start by creating an App Store Connect record. Here’s how:Create or Join an Organization: You can either set up your own App Store Connect organization as the team agent or join an existing one. Use the Apple ID associated with your Apple Developer Program.Handle Contracts for Paid Apps: If your app will cost money, you’ll need to agree to the payment terms. Go to Agreements, Tax, and Banking in App Store Connect, view the terms for “Paid Apps,” and agree to them.Step 3: Set Up Your App on App Store Connect
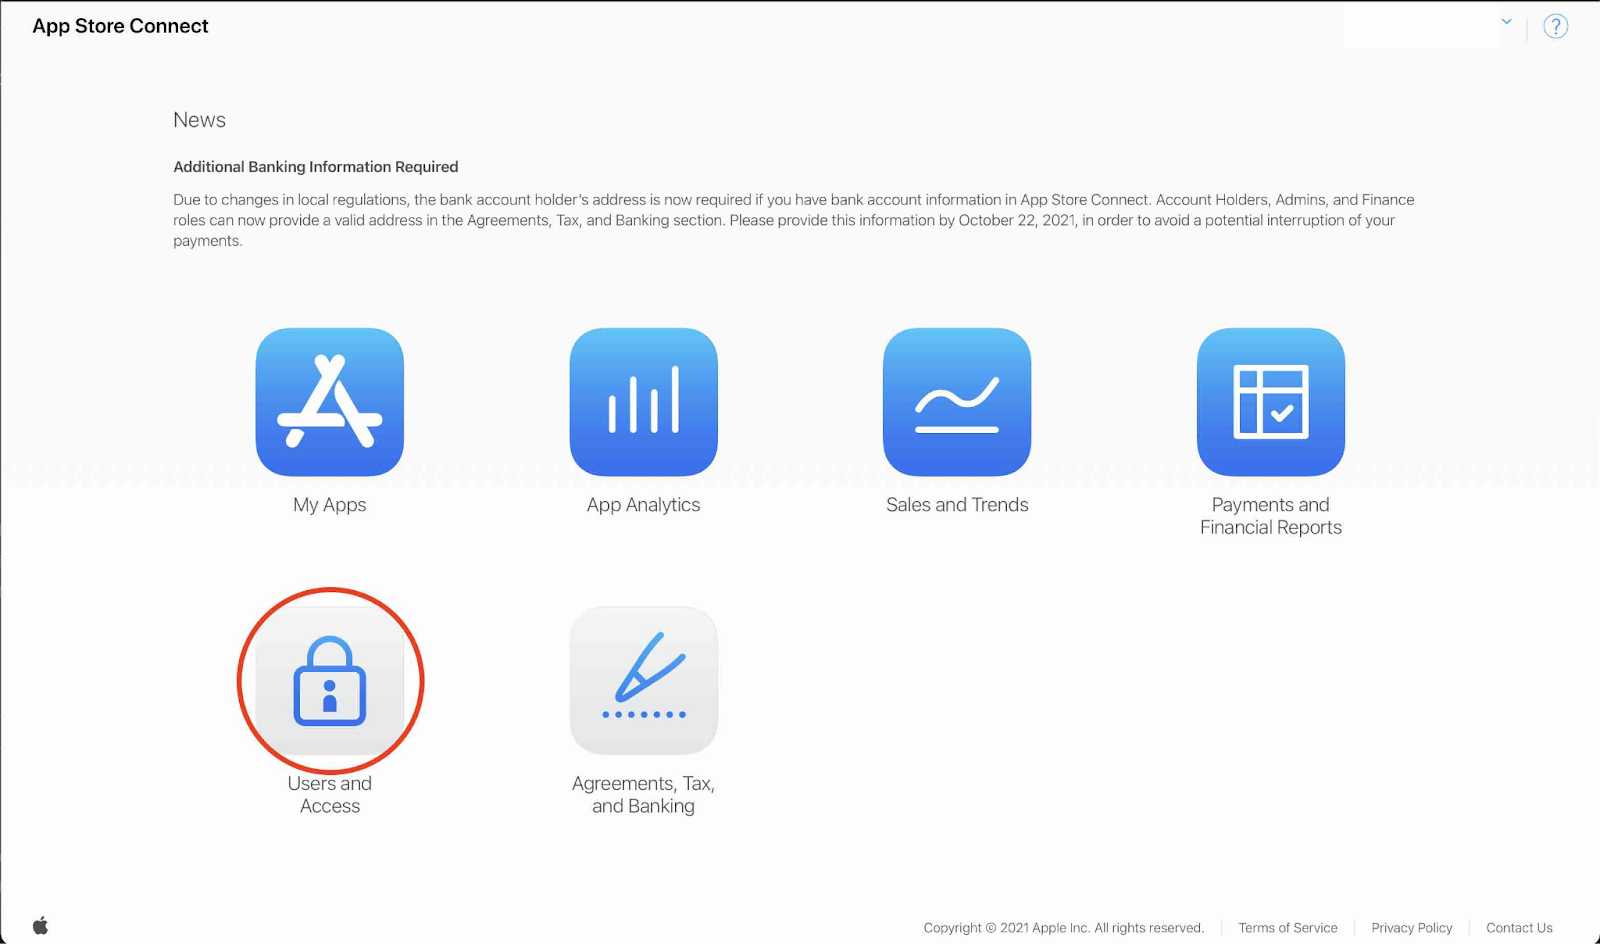
Banking and Tax Information: Next up, add your bank account details and complete the necessary tax forms. This is crucial for processing payments and ensuring compliance.Add Your New App: In the App Store Connect dashboard, click on ‘My Apps’, then add a new app. You’ll need to provide specific information like the platform, app name, primary language, bundle ID, and SKU. Remember, your app name should include keywords for better discovery, and the bundle ID must match the one in your Xcode project. The SKU is your internal identifier and should start with a letter or number.Finalize and Submit: Double-check all the information you’ve entered because changing it later might be tricky. Once everything looks good, you’re ready to move on to the next steps in the submission process. Here’s how to get your app from Xcode to the App Store:Open Xcode and select ‘Generic iOS Device’ as your deployment target.Click on ‘Product’ in the top menu and choose ‘Archive’. This opens the Xcode Organizer, showing your past archives.Step 4: Upload Your App with Xcode

Select ‘Distribute’ and pick ‘TestFlight & App Store’ as your distribution method, making sure your current build is selected.Click ‘Distribute’ in the bottom corner, then ‘Upload’ on the next page.You can choose to upload your app symbols here. After that, click ‘Distribute’ again to finalize the upload. Start by setting up your app’s basic info under the “App Store” tab. In the “App Information” section, add languages, categories, and your Privacy Policy URL. On the “Pricing and Availability” page, you can decide if your app is free or if it will have a price tier.Step 5: Configure Your App’s Metadata
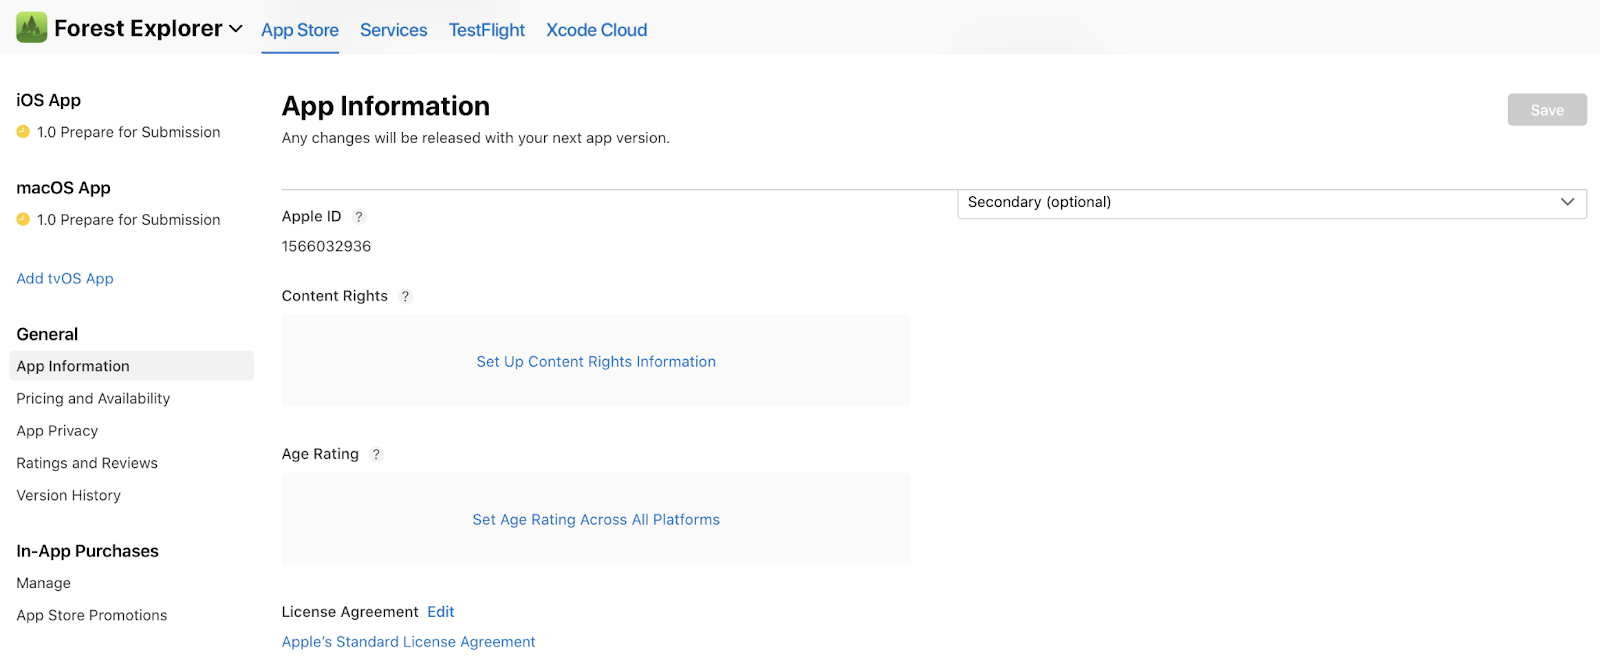
Next, under the “Features” tab, add configurations for any App Store technologies like Game Center or in-app purchases that your app uses. Your app will now show a “Prepare for Submission” status. Here, select the build you want to submit and start fleshing out your product page details.Upload your app’s screenshots, formatted in JPEG or PNG without status bars. You can use one set for all device sizes. Then, fill in your app’s description, keywords, support URL, and optional marketing URL. In the “General App Information” section, add your app’s icon, version number, copyright, and contact information. Your icon should be 1024px by 1024px, and the version number must match the one in Xcode. The copyright info is usually formatted like “Copyright (c) [Year], [Company Name]”.Finally, under “Rating,” choose options that accurately reflect your app’s content. In “App Review Information,” provide your contact details, notes for the reviewer, and set the version release date. It’s typically best to leave the release date as automatic for first releases. Now, navigate to the “Build” section of your app’s record. You’ll see an option that says, “Select a build before you submit your app.” Click on that.Choose the build you previously uploaded via Xcode. After selecting it, click ‘Done’ in the bottom right-hand cornerStep 6: Submitting Your App for Review
.
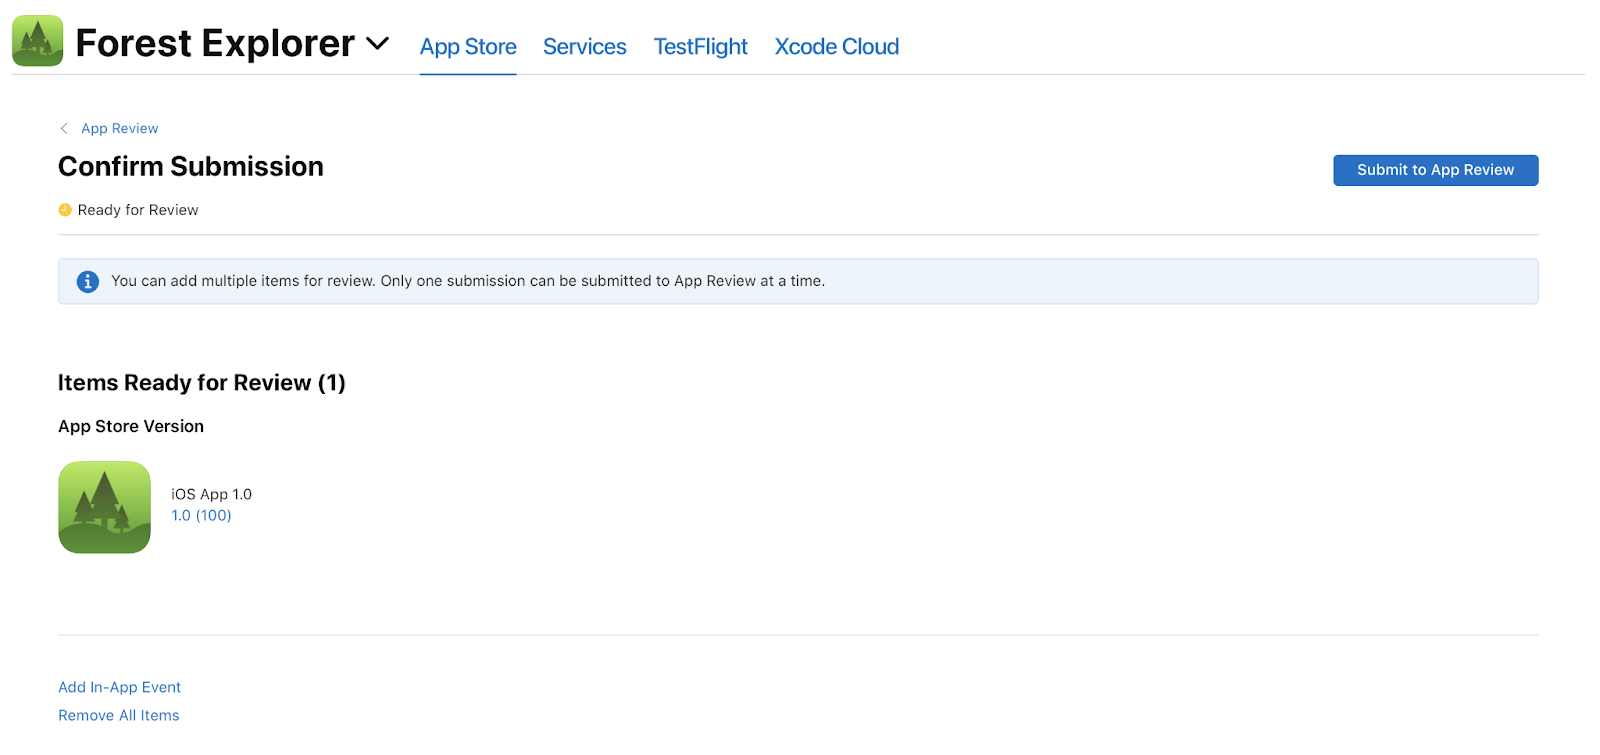
Don’t forget to hit ‘Save’ in the top-right corner. Now, you’re ready for the final step – click ‘Submit for Review’.Here’s a cool fact: Apple reviews 50% of apps within 24 hours and 90% within 48 hours. So, if everything in your submission is set, you’ll likely hear back within two days.After the review, your app’s status in App Store Connect will be updated, and you’ll get a notification about the status change. That’s all there is to it.Congratulations! You’ve successfully published your first app to the app store, and it’s ready to serve the end user.We, at Segwitz, are dedicated to helping you make the best out of technology by serving as your trusted end-to-end tech strategist and development partner. If you have any more queries on the subject, feel free to contact us. If you’d like to read more on mobile app development, the latest tech news, and helpful tech tips, feel free to go through our extensive library of blogs. Let’s Chat!